TianGong LCA MCP (Remote)
For the latest release notes, tooling samples, and integration tips, visit the TianGong MCP Hub. This page highlights the essentials for using the remote service.
Remote Authentication
Remote access requires Bearer token authentication. Currently, there are two main methods to obtain Bearer tokens: through OAuth 2.0 Flow and through Tiangong Life Cycle Data Platform.
Tiangong Life Cycle Data Platform
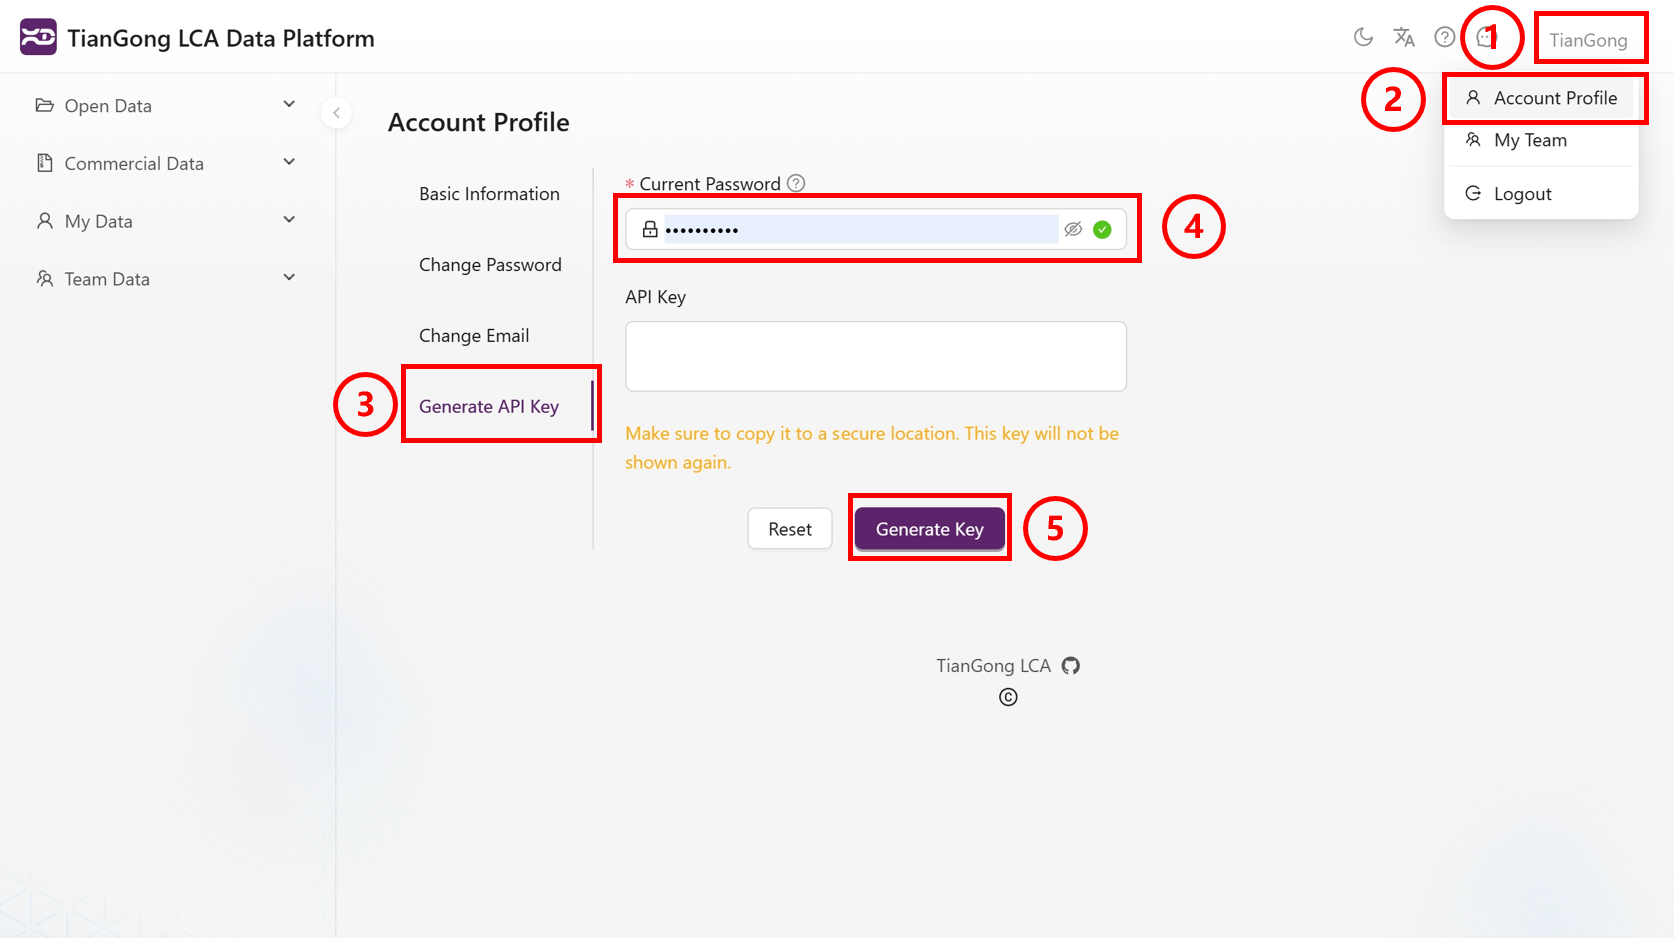
Log in to the Tiangong Life Cycle Data Platform. For user registration and login guidance, please refer to the official documentation. After successfully opening the page, perform the following operations.
-
Personal Information Expansion: Click on the personal name in the upper right corner of the top toolbar to display a dropdown box.
-
Account Information Selection: Select "Account Information" from the dropdown box to navigate to the account information page.
-
API Key Generation: Click the "Generate API Key" button in the right sidebar.
-
Password Verification: Enter the platform password in the popup box for verification.
-
Key Acquisition: Click the "Generate Key" button to successfully obtain the API Key.
OAuth 2.0 Flow
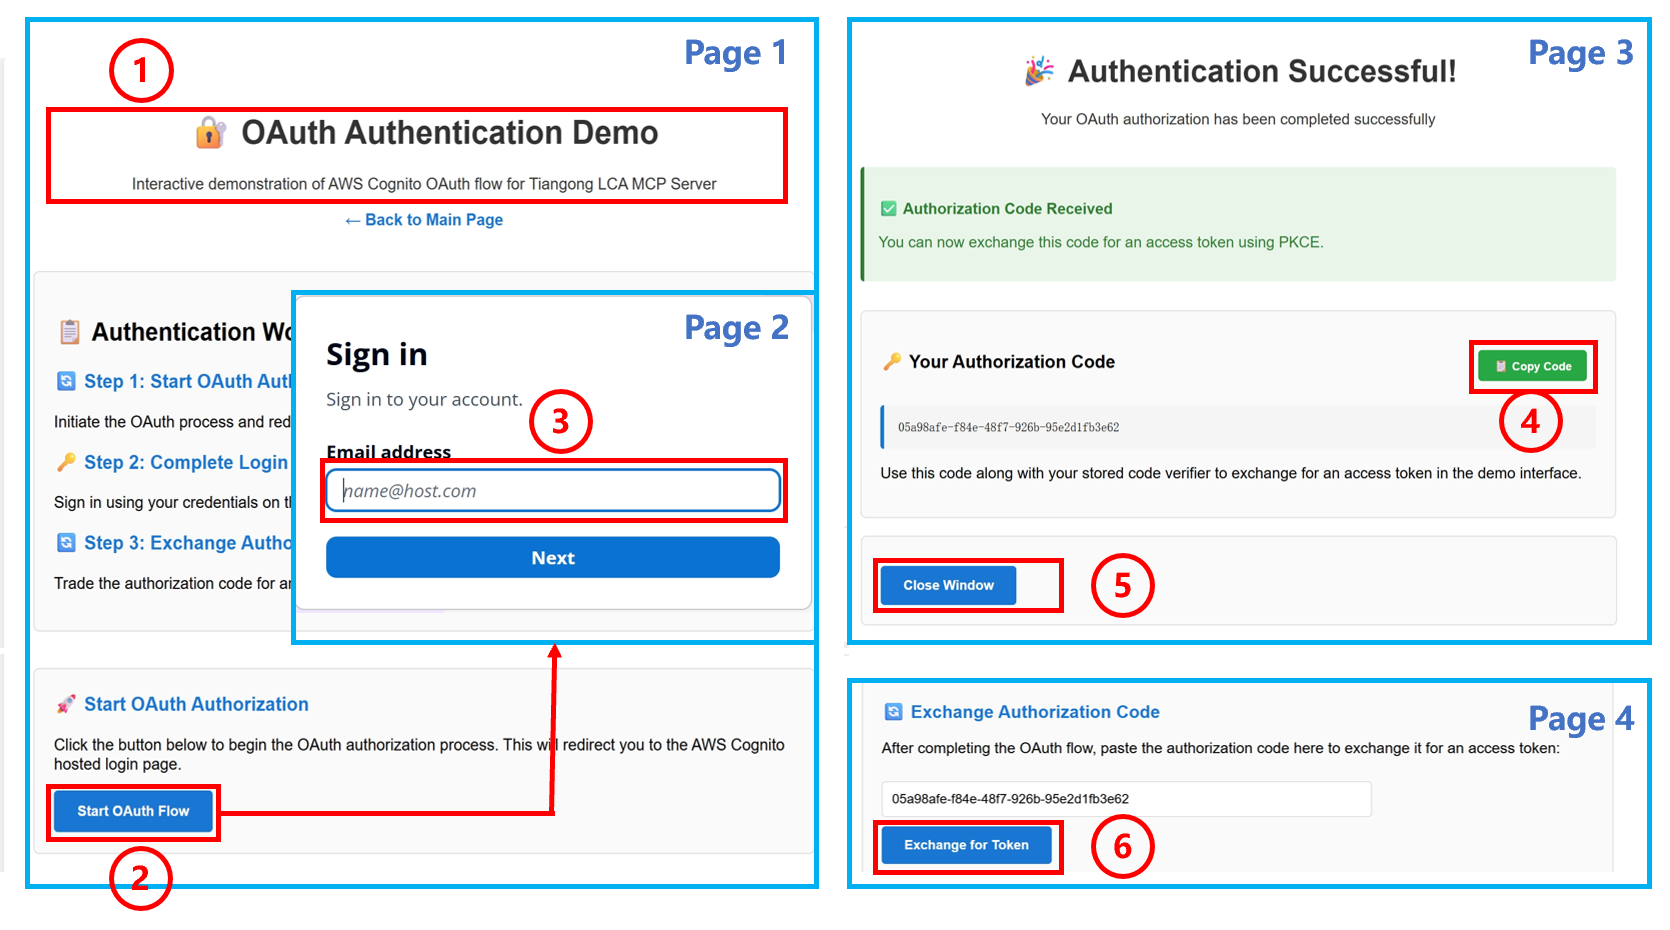
- OAuth Interface Access: Open the Tiangong MCP Server OAuth Authentication Demo interface.
- Authorization Process Initiation: Scroll down the page, find the "Start OAuth Flow" button, and click to begin authorization.
- User Login Verification: Log in using the username and password registered on the Tiangong Life Cycle Data Platform.
- Authorization Code Acquisition: After successful login, obtain the Authorization Code and copy it for safekeeping.
- Window Closure: Click the "close windows" button to return to the main interface.
- Authorization Code Exchange: Paste the copied Code into "Exchange Authorization Code" at the bottom of the page, click the "Exchange for tokens" button to obtain Access token and Refresh token.
MCP Server Invocation
Inspector
MCP Inspector Launch: Enter the following command in the terminal, which will automatically redirect to the Inspector page.
npx @modelcontextprotocol/inspector
-
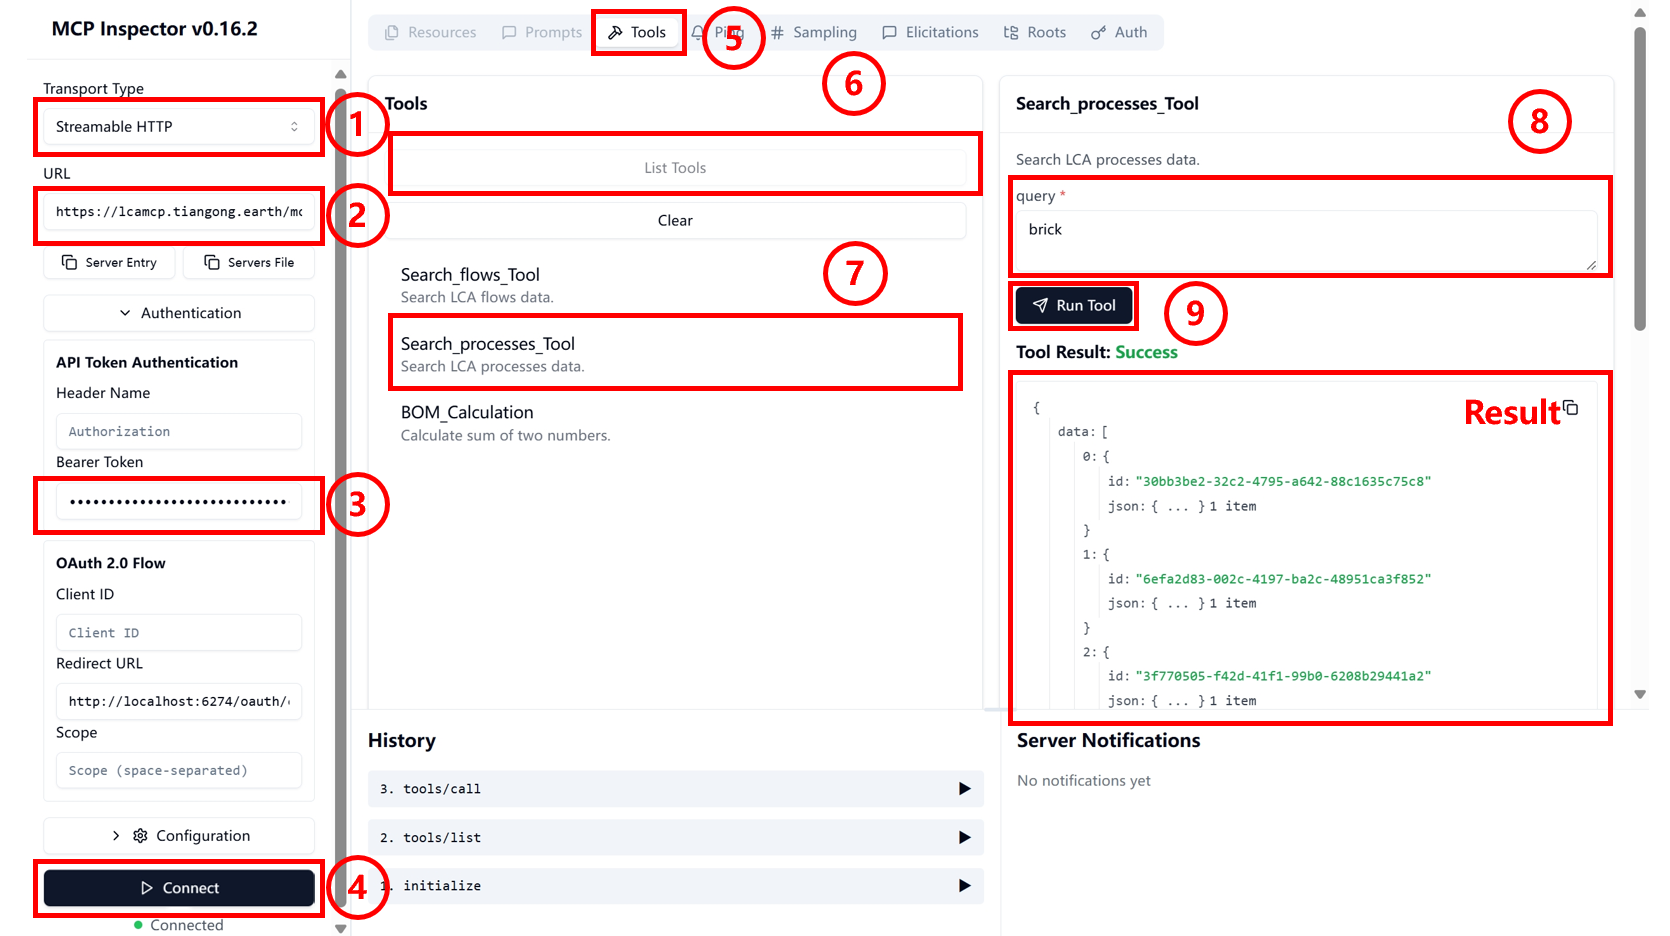
Transport Type Configuration: On the Inspector page, click the dropdown box and select "Streamable HTTP".
-
URL Address Configuration: Fill in the MCP Server port address in the URL field: https://lcamcp.tiangong.earth/mcp.
-
Token Configuration: Enter the Access token or API Key obtained from the above process into the corresponding token field.
-
Server Connection: Click the "connect" button to establish connection.
After successful page connection, the following demonstrates the application method using process search as an example.
-
Tool Operation Selection: Click the "Tools" button on the top toolbar of the page.
-
Tool List Expansion: Click the "List Tools" button to display the dropdown tool list.
-
Search Tool Selection: Click the "Search_processes_Tool" button in the list.
-
Search Parameter Configuration: Enter the process keywords you want to search for in the corresponding input box.
-
Tool Execution: Click the "Run Tool" button to execute the tool and view the search output results.
Cherry Studio
At the Cherry Studio official website, follow the official documentation to download the software to your local machine and open it.
-
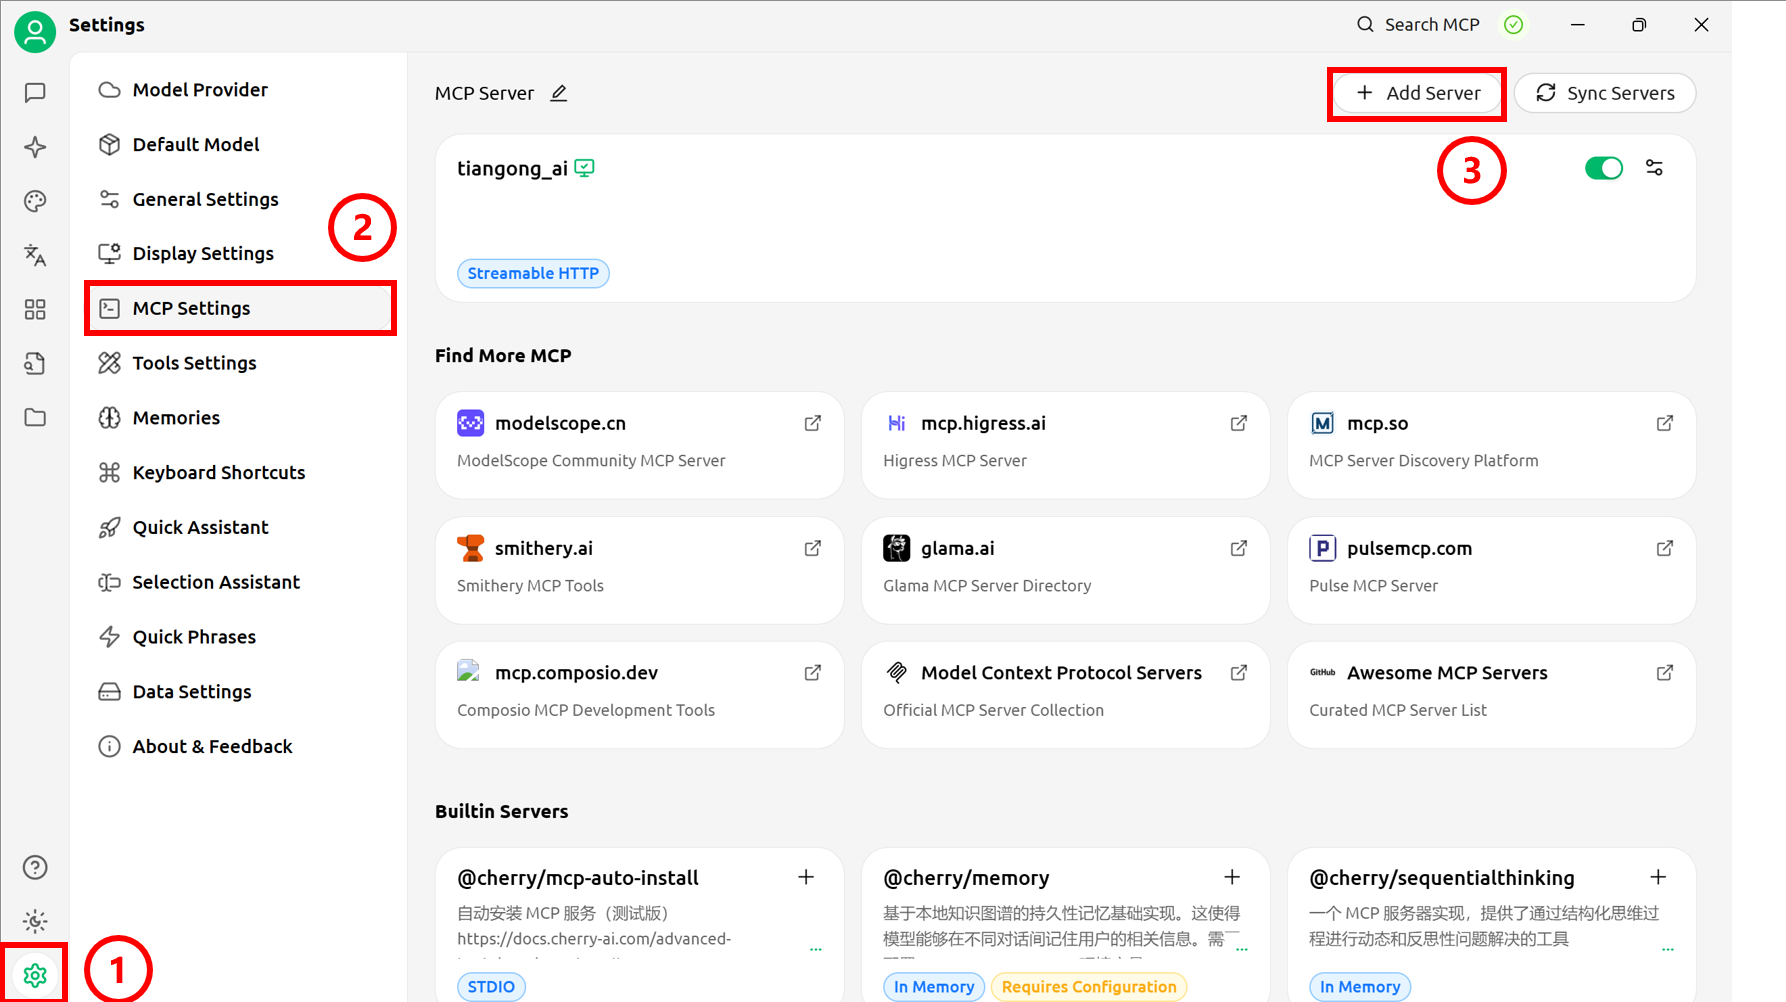
Settings Panel Opening: Click the settings button in the sidebar to open the settings panel.
-
MCP Settings Access: Select "MCP Settings" option to navigate to the MCP configuration interface.
-
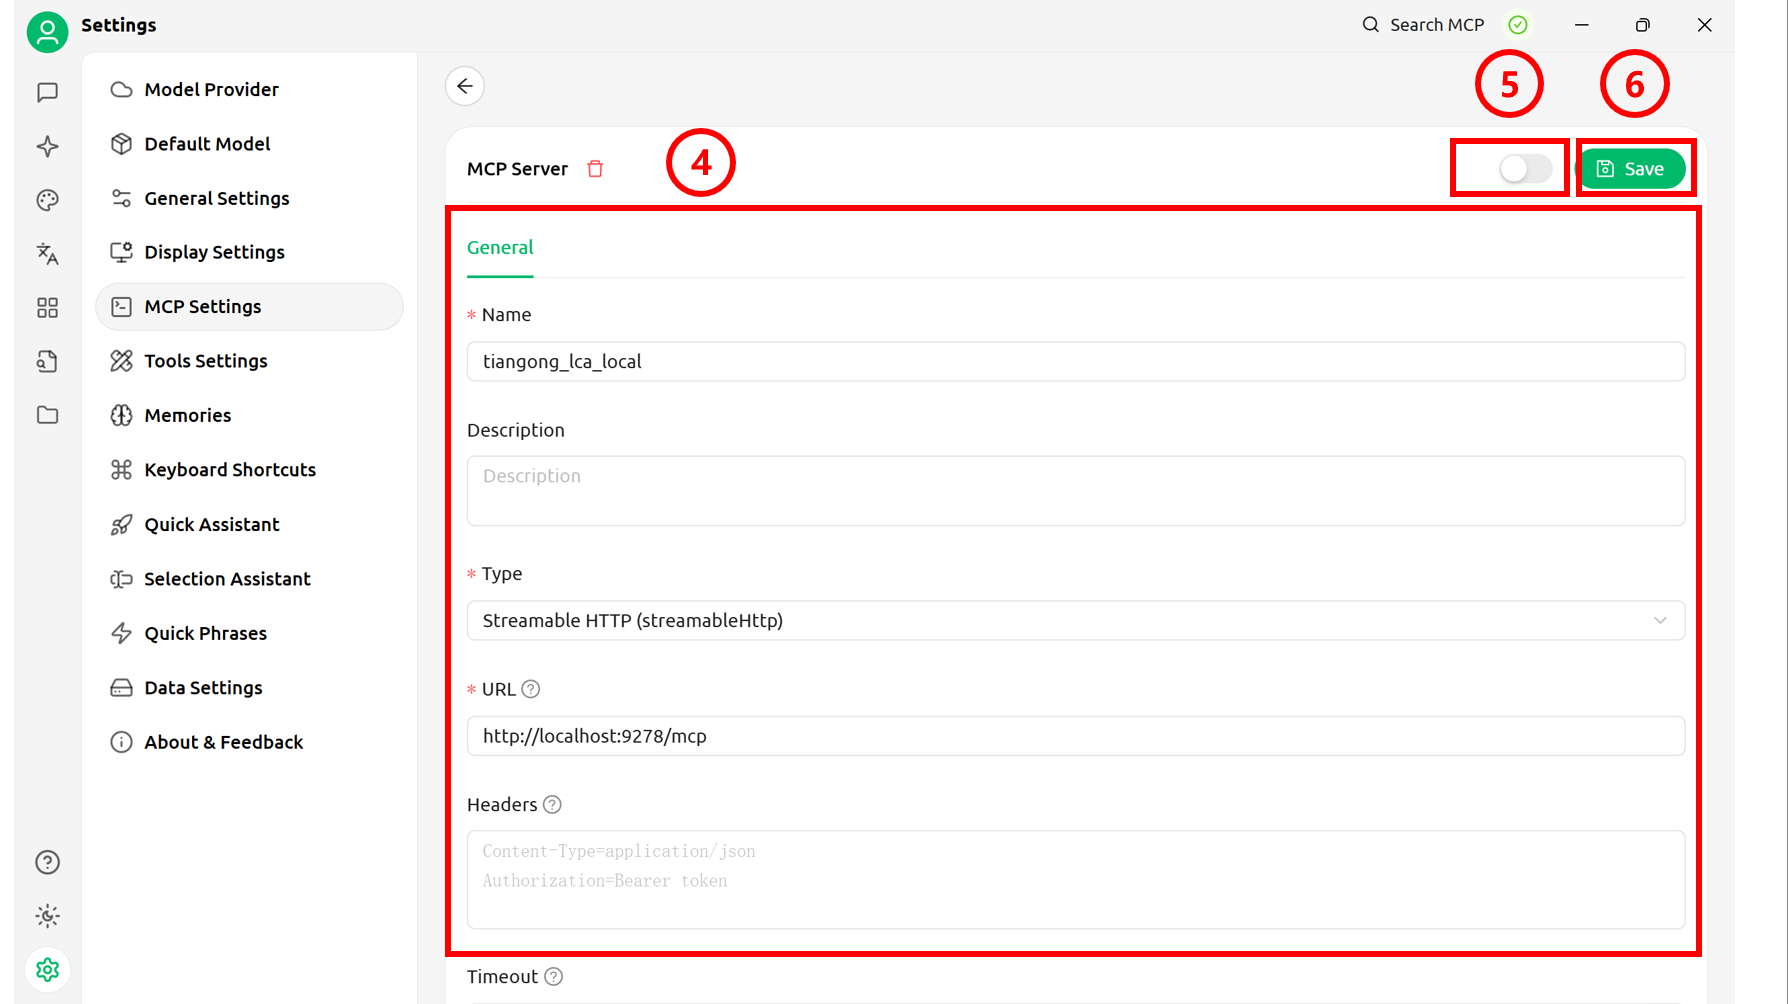
MCP Server Addition: Click the "Add Server" button in the upper right corner to navigate to the MCP Server configuration interface.
-
Server Information Filling: Configure basic information for the remote MCP Server (XXX in Headers is the obtained Access token or API Key).
Type: Streamable HTTP
URL: https://lcamcp.tiangong.earth/mcp
Headers:
Content-Type=application/json
Authorization=Bearer XXX -
Configuration Information Saving: Click the "Save" button to save all settings.
-
MCP Connection Startup: Click the startup button to open the MCP Server connection.
-
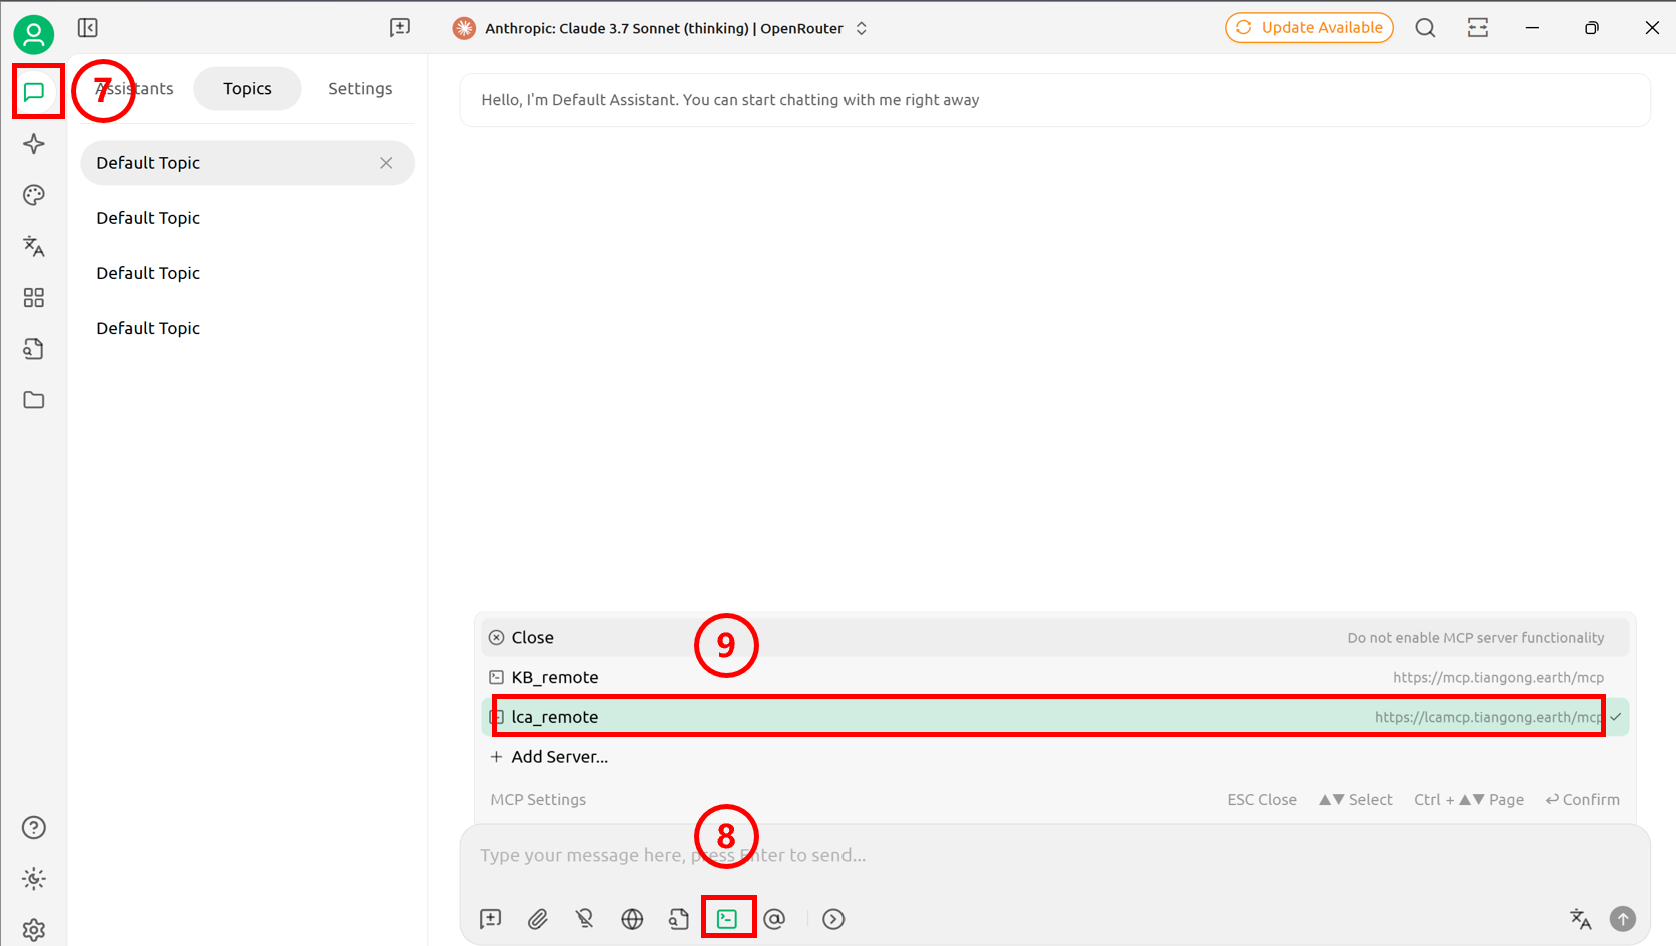
Chat Interface Creation: Click the top button in the sidebar to return to the main page. Configure the model (refer to official documentation) and create a chat page.
-
Server Connection Configuration: Click the "MCP Settings" button below the conversation box.
-
MCP Service Selection: Select the required MCP server from the popup options.
Dify
-
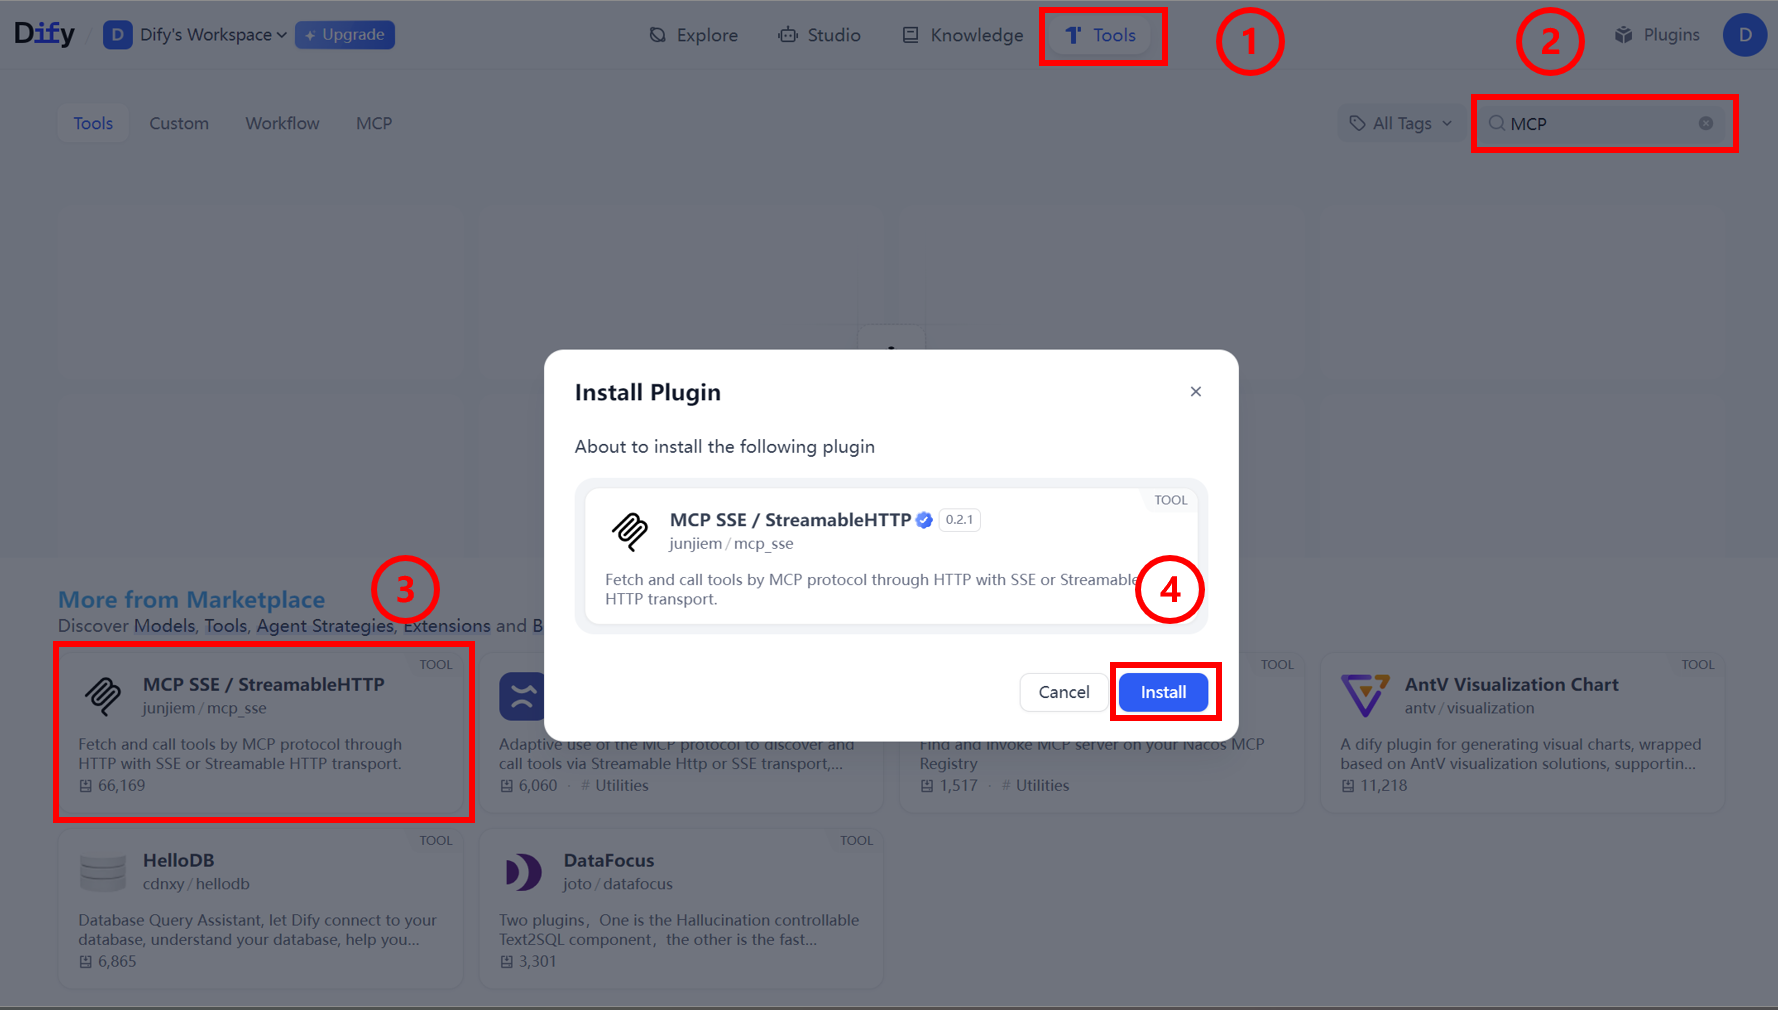
Tools Page Access: Click the "Tools" option in the top toolbar to navigate to the tool management page.
-
MCP Tool Search: Enter "MCP" keyword in the search bar to search.
-
Tool Market Download: Find and download the MCP tool in the Market place (the highlighted tool in the figure is the recommended tool).
-
Tool Installation Execution: Click the "Install" button to complete MCP tool installation.
-
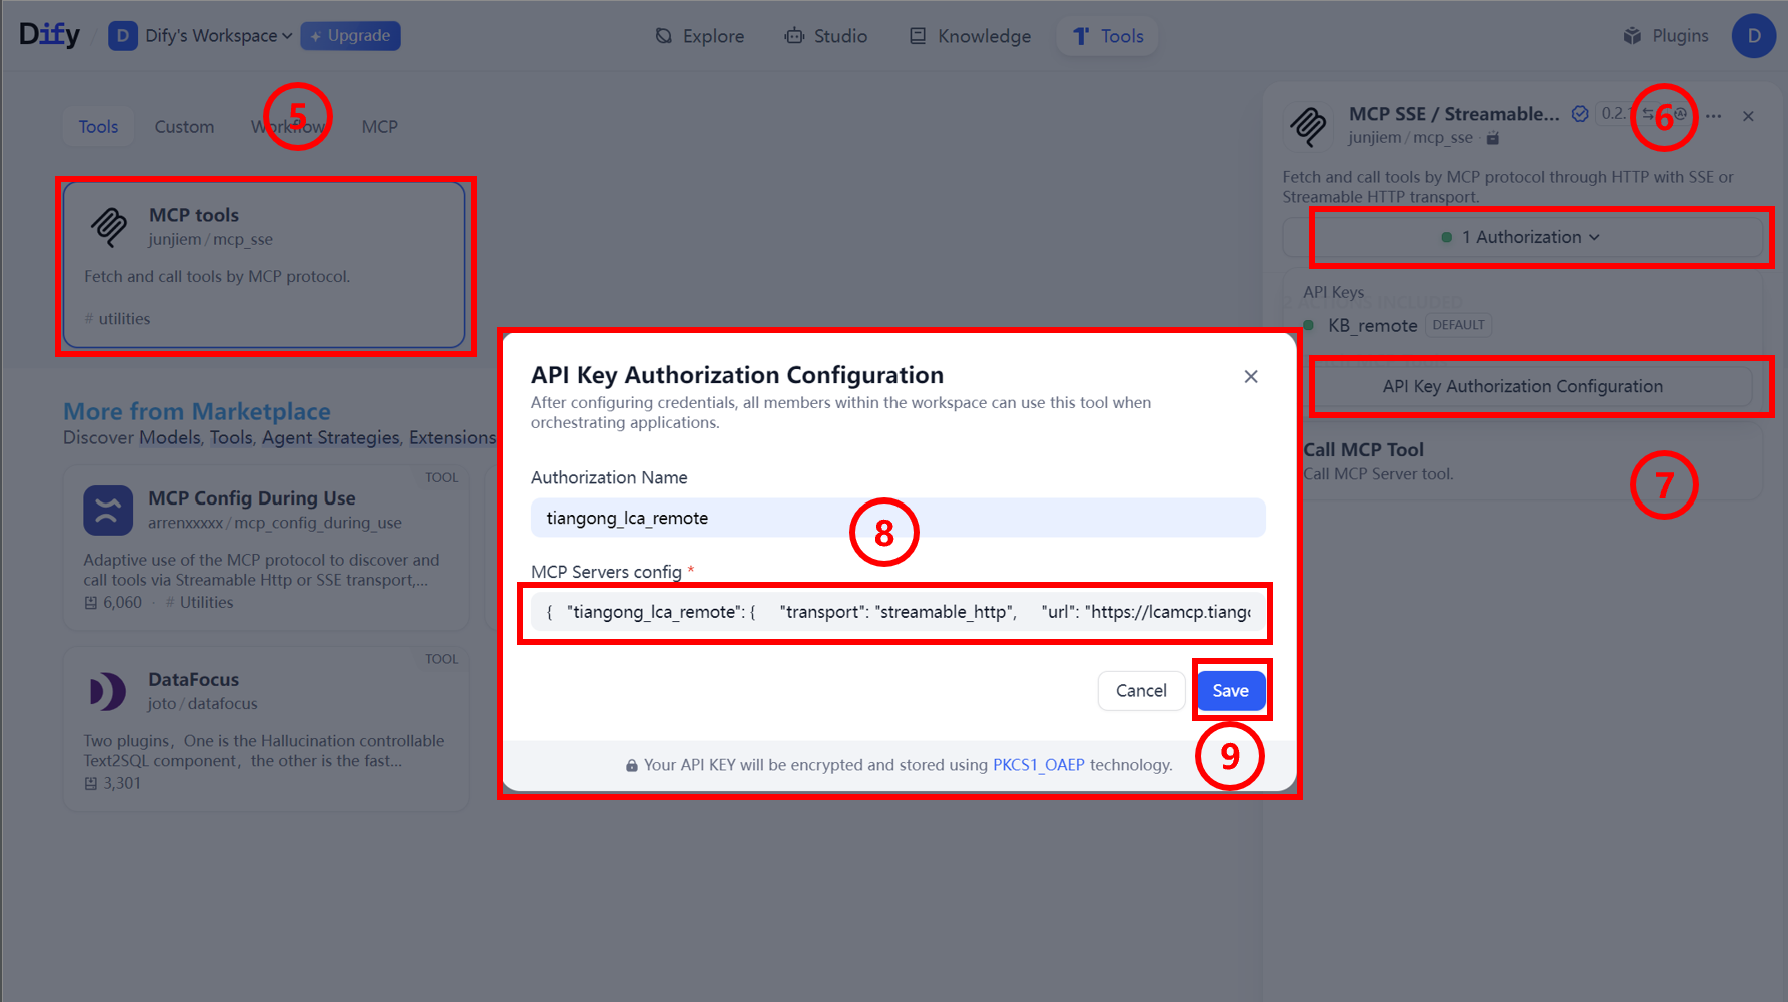
Configuration Panel Opening: After MCP tool installation is complete, click the popup configuration panel.
-
Authorization Configuration Access: Click "Authorization" to configure MCP authorization.
-
Configuration Window Opening: Click to open the MCP detailed configuration window.
-
Basic Information Filling: Fill in necessary connection information in the configuration window. (Example below)
{
    "tiangong_lca_remote": {
    "transport": "streamable_http",
    "url": "https://lcamcp.tiangong.earth/mcp",
    "headers": {
        "Accept": "application/json,text/event-stream",
        "Authorization": "Bearer XXX"
    },
    "timeout": 50,
    "sse_read_timeout": 50
    }
} -
Configuration Information Saving: Click the "Save" button after completing the form.
-
Workflow Construction: Build workflows or agents in Dify to invoke MCP.
- For creating agents and workflows, refer to official documentation.
- For MCP applications, refer to official documentation